Showing posts with label condo. Show all posts

February 20, 2012

Nursery Painting

The nursery is painted! Oh I am so excited! It looks absolutely fabulous. We went with "Friendly Gray" in eggshell from Sherwin Williams. It's a light, soft gray that I think will look really great as a back drop for Baby's furniture.


In our condo, we have 3 bedrooms...the master bedroom, the guest bedroom, and the other bedroom. The other bedroom has been many things to us over the past 3 years. It started as a junk room, a place to put all our stuff as we were moving in and trying to figure out what the heck we were doing.

Next, John convinced me to transform the room into a Man Cave. You can read more about that here. Yep, we painted the walls a dark blue and set up a place where he could hang out and do manly stuff.


Then, for about 6 months, John's sister moved into the other bedroom and John's cousin moved into the guest bedroom. I don't have any pics, but the walls stayed blue and we just moved all of John's stuff to other parts of the house while his sister was staying with us.

John's sister and cousin moved out in June 2011. Since June was the month that we decided to start trying to expand our family, we decided to leave the room empty in hopes that one day in the not-so-distant future it would become a nursery.

Since you already know that I'm pregnant, it shouldn't come as a surprise to find out that that's exactly what happened. So this past week, we got the ball rolling by hiring Jorge to come in and paint the nursery.


Jorge was a total rockstar and knocked it all out in one evening! He used one coat of primer and then two coats of paint on the walls. On the trim he used "White Dove" by Benjamin Moore (just some leftover white paint we had).


Now that the room is painted we can starting putting the furniture together and creating a nice space for Baby. It's so exciting! :)

April 30, 2011

Gallery Wall

Gallery Wall


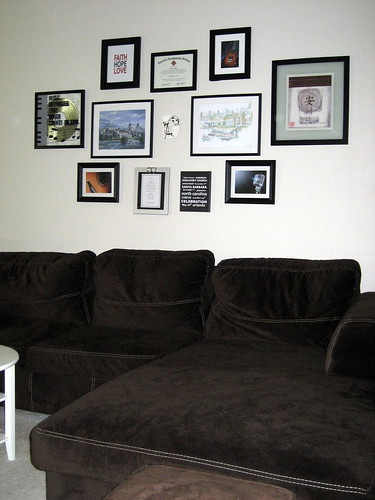
For the 2 years that we've lived in this condo, we've always had trouble with the wall above the couch. We really like our couch, it's soooo soft. And the only place it can go is against this wall in our living room. But the wall that it's against is huge! It slants up to at least 12 feet at it's highest point because we have vaulted ceilings. Which I also love, I just have had trouble figuring out what to put on it. Everything we've tried just seems so small on such a huge wall. But putting something HUGE would look totally weird because it would probably look bigger than the couch.

So we've tried art, different art, two pieces of art, single pieces of art. Pretty much, I wasn't happy with any of it. Then, last November, we cleared out John's man cave to make room for Joanna and I had this pile of frames and art and stuff sitting on the floor of our bedroom. It was a light-bulb moment, for sure. What was cool, was that there were some pictures that were more John and some that were more me, but they all looked kinda neat together. Crazy!

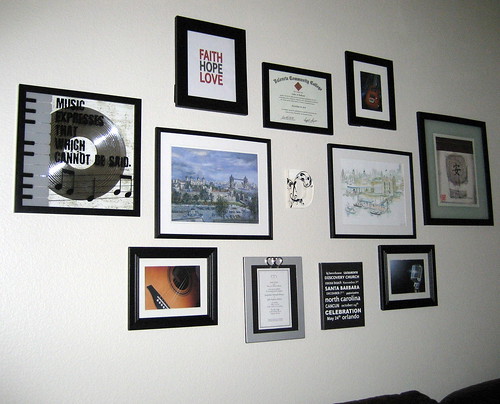
It only took 6 months, but I finally put all the stuff up on the wall above the couch and made a gallery wall. I love it!!!

Funny thing, I read tons of blogs and websites that shared tips on how to create a gallery wall. So I started out by laying everything out on the ground, arranging and rearranging until I found a layout that I liked. Then I took a picture of the layout to reference during the process. Then I picked up all the frames and set them aside because we couldn't even walk through the living room. Of course, I did this part at 11:00pm and couldn't actually start hammering nails into the wall because I want our neighbors to like us and not call the HOA and complain about us.

So the next day, instead of doing the normal thing, which would have to been to actually put the frames up on the wall....I took a trip to Target and grabbed more frames for some art that John brought back from England in March. Then I came home, framed the additional art, and started hanging things on the wall in a completely different layout than originally planned. I know, I spent all that time planning and then in the end just randomly hung the stuff on the wall.

Well, it ended up working out. And because I really like things symmetrical and balanced (I'm an accountant!) the final product is very much my style! I had to bring in things from different parts of the house that I wasn't originally planning on using because of how the arrangement was flowing, but I think it looks 10 times better than my original plan. See, I can be spontaneous!

Gallery Wall

Here are a few close up's:

Gallery Wall

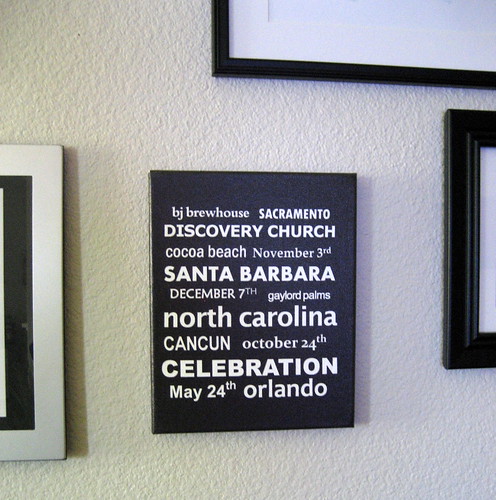
I had this canvas made for John back in January. I saw a coupon for a canvas wrapped "photo" and I couldn't pass it up. The canvas was free and I paid $5.99 for shipping. Pretty good deal! I created the "photo" in Microsoft Publisher because it provided more flexibility of placement than Word, but it also had all the different fonts to choose from. I saved it as a .jpeg and then uploaded it to Winkflash.com. It was really easy. I could view the final placement and make sure that the photo was centered on the canvas the way I wanted it to be. Then I just hit submit and paid for the shipping. It came a few weeks later. Actually, it took longer than anticipated because they were so backed up with orders from the promotion that they were running. But a representative called me to tell me that personally and told me the date it could be expected by. The delay didn't bother me at all because I wasn't in a hurry for it. This was just a surprise gift that I ordered for John so I wasn't up against a deadline for a special occasion.

The canvas has dates and places that are meaningful to John and I from when we first started dating, up until our honeymoon. I actually started creating that just after we got married, but wasn't sure what it was actually going to become. I really loved how it turned out!

Gallery Wall

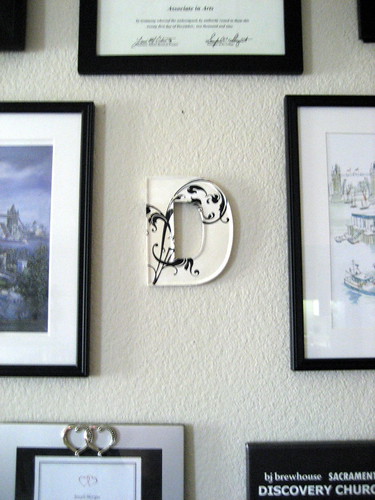
I found this "D" at Hobby Lobby last weekend and I thought it would make a fun addition to our gallery wall...you know, because our last name is Dodson! :)

January 23, 2011

Virtual Garage Sale

**All these items have been sold.**


If you're interested in any of these items, please contact me at jackiedodson24@gmail.com or message me on Facebook. Thanks!

FOR SALE: Coffee table ("Ramvik" from Ikea) - $50 obo - http://www.ikea.com/us/en/catalog/products/10103719


Coffee table also has drawers on each side for extra storage.


FOR SALE: Side table ("Expedit" from Ikea) - $20 obo - http://www.ikea.com/us/en/catalog/products/40147731


FOR SALE: Light fixture (from Lowe's) - $30 obo

November 26, 2010

Dining Room Update

After giving away our dining set, I was super anxious to find a new table and chairs for our dining room. So I started scouring Craigslist and on Tuesday I found a great deal. The set came with 6 chairs! 6 chairs! The table even expands to seat 8. I am thrilled! And I think it looks great :)

November 12, 2010

Good Bye Dining Set

Our dining set is getting ready to go to it's new home. I wish we had many dining sets to give away because apparently there are quite a few of you in need of tables and chairs. But alas we only had one set and we're pleased that it's going to a good home.

Now that the old dining set is on it's way out, I get to focus on what's coming in to take it's place. My main desire in a new dining table is that it be regular height, not counter height. I'm not that tall and I've learned that counter height chairs are not that comfortable for me, so moving to a regular height table is a must. Also, I would like the table to seat at least 6 people, more if needed. This means I'd like a rectangular table and it would be ideal if it had a leaf to expand the table. But that's not a necessity. With a regular height table we can always pull up more chairs and squeeze another guest at the table. We couldn't do that with our counter height table because our extra chairs were regular height and they weren't tall enough to pull up to the table.

So the search is on for a new dining table and some chairs. I'm scouring Craigslist and thrift stores to find a table with good bones that we can sand down and paint or refinish. That's my first priority - to find a good, cheap table that we can makeover and will fit our needs. Then I'll be on the hunt for some chairs. John and I are thinking that getting a bench for one side of the table would be a fun addition too. So maybe 4 chairs and a bench...or 6 chairs...or 2 head chairs and 4 side chairs. There are so many different ways we can go with the chairs that I still haven't made up my mind yet.

Here are some tables that I'm admiring right now. I'd love to find one of these at my local thrift store :) Which one do you like?

November 3, 2010

Another Fabulous Freebie

Are you in need of a dining table and chairs? Do you know someone who needs a dining table and chairs? Then this is the post for you!


John and I were so blessed when our friends gave us this counter-height dining set as a wedding gift. They were upgrading their dining room and excitedly passed this set along to us. And we were just as excited to receive it. The table has a black finish and a frosted glass insert for visual interest. And the neutral fabric on the chairs gives this set a really modern feel.


As much as we've enjoyed this dining set for the past year and a half, it's time for us to move on to something different. Which could be good news for you, if you need a dining table. :)


John and I are giving this dining set away for free. We were blessed when it was given to us and now it's time to pass the blessing on to someone else.


If you are interested in the dining table and chairs, please contact me at jackiedodson24@gmail.com or leave me a comment here or on facebook.

October 2, 2010

Before & After: Thrift Store Chairs

A few weeks ago, I got these

at a local thrift store,
for this much

I used some white paint leftover from another project
("Swiss Coffee" by Behr) and went to town.


Then used some random fabric from the closet,
along with our new staple gun,
to get this


They're nice and simple. I don't have a picture of the second one,
but it looks identical to the one above.

I imagine them around my new dining table (that I don't have, yet).

Looking splendid and fabulous.

Overall, my first chair makeover gets an A.

September 28, 2010

Laundry Made Easier

And all we did was add a simple, wire shelf. We needed a quick fix in the laundry room and the answer was a shelf. We already had this wire shelf, except that it was three times longer than what we needed. So John just used wire cutters and cut it to out desired length. I added one of the baskets that we recently bought from Ikea to hold the detergent and dryer sheets. And now there's also a place for the iron and some hand towels. Perfect!

September 6, 2010

Closet Addition

Do you remember last week when I blogged about Google Sketch Up? Well it really worked! During this past Labor Day weekend, John and I made a trip to Ikea to buy an Expedit shelf. Originally, we thought that using multiple shelving units hung together would be a better option for us just in case we wanted to move things around later. But when we started thinking about hanging the shelves on the wall, we realized that it would be much easier if we were only working with one solid piece, instead of separate pieces. To be honest, the thought of getting the shelves to hang exactly level was too overwhelming. So instead we picked out a 2 x 4 shelving unit and hauled it home. This was probably one of the easiest Ikea pieces that we have put together (and by we, I mean John). It only took him about 30 minutes and the whole thing was together and in the closet!

I love white against our gray walls. And I haven't regretted our gray wall color for even a moment since it went up! It's perfect! I also love the substantial-ness of this Expedit shelving unit. It's weighty and strong and has presence. And I love that it's going to live in our closet. Our closet needed a little bit of sass, and this shelf is the perfect amount of sass.

Anyway, as you can see, we haven't hung it yet. Baby steps, people. But I have started using it since before this my clothes were piled up on the floor along with the shoes.

Since I took this picture, John has moved his clothes out of the dresser and into the empty boxes above. We only purchased one Expedit shelf this weekend because that was all we could afford this month. Although, I did manage to pick up a few baskets while we were at Ikea as well. I picked out a set of 4 baskets for $9.99. They were all different sizes but the price was better than the alternatives. The basket in the photo is being used to hold my undies :) No one needs to see those all strewn about. I'll show you what we did with the other 3 baskets over the next few weeks.

I'm really happy that we took some time to think outside of the "box" and found a non-traditional way to make our closet more functional. Using Google Sketch Up was one of the best things we did. We knew that the shelf would fit inside our closet and we knew that we would love the way it looked, all before actually purchasing the unit. Now that's fabulous!

August 30, 2010

Google Sketch Up


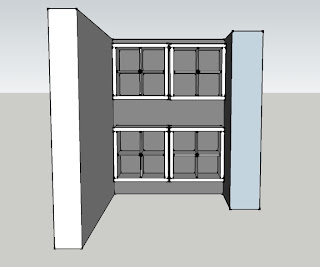
Last week we were hanging out with our friend Damien and he told us about this super neat program called Google Sketch Up. Since John and I are big Google fans, we went right home and started playing around. Let me tell you, this program is pretty dang cool. It's pretty user friendly, although it does take a little getting used to. For our first sketch....our master closet.

For months now, we have been living with half a closet. Our master closet is a pretty substantial walk in. We took down the wire shelves when we moved in so I could paint. Then we hung two of the shelves back up on the left wall and it turned out that all of our hanging clothes fit on those two shelves. But we still have the whole right side with nothing. No place for shoes, no mirror, no hooks, no nothing.

One of the hardest things for John and I is trying to figure out what will be most useful in the closet and then picturing what it's going to look like. That's where Google Sketch Up comes in. We took some quick measurements of the walls on the right side of the closet and started sketching. Then we started brainstorming different options. We don't need any more hanging space, so we started thinking about shelves. I didn't want to use dressers and I really wanted to utilize the vertical space in the closet. That led me to Expedit from Ikea. Now here's the cool part...Google Sketch Up allows you to search for an item and then import in into your sketch. It was so easy! We imported different Expedit shelves into our sketch and started playing around. Since the Expedit shelves were imported to size, we could move them around the space and see what fit and what we liked.

After many different scenarios, we decided upon 4 Expedit shelves with four boxes each. We are going to mount them to the wall so we can utilize the space underneath for our shoes. Some of the shelves will hold baskets and some will hold folded shirts and pants. We are going to hang a mirror on the wall to the left of the shelves and hooks on the small wall to the right. It turned out pretty simple but I think it will be just what we need. We decided to go with 4, 2x2 shelves instead of 2, 2x4 shelves because we think they will be more versatile in the future. If we ever move, we could use them in other rooms for other functions.

Now we just need to go get the shelves, put them together and hang them on the wall :)

August 5, 2010

Much Needed Wall Decor

Ribba frames from Ikea + pictures taken on our 1 year anniversary trips = fabulous decor in our bedroom!


San Diego, CA

Atlanta, GA

Hilton Head, SC

Ball Ground, GA

July 3, 2010

Our Porch Garden

I love plants. However, in our family, John definitely has the green thumb. I don't know what it is, but I just have a hard time keeping plants alive. After our vacation to Ball Ground, GA and Chatanooga, TN we decided to start a garden, and I'm going to try extra hard to remember to water. :) We've started slow, but just wait until all our plans come together. There will be large, custom built planter boxes filled with flowers, herbs and vegetables lining our porch.


This is the newest addition to our garden....sweet peas. I just planted them this week so it'll be a while before they start showing off. We snagged this sweet pea kit at Target.


And it was on clearance. Only $3.24 for the pot, the soil and the seeds!


This interesting looking plant is called a flap-jack. John's aunt and uncle gave us this plant when we stayed with them during our vacation. I love it! It's so unique. The best part about flap-jacks is that they can survive with minimal water. Now that's my kind of plant!


This palm actually has a name....David. David is our second palm. Our first palm, Palmer, met an untimely death a few months after it came to live with me. So now we have David. Is our obsession with 24 obvious?


What's in your garden?

July 2, 2010

Beautiful Blossoms

I was so excited when Camila from High-Heeled Foot in the Door blogged about the Boston Public Library flickr account. The library has hundreds, maybe thousands, of prints that can be downloaded for free. I found these gorgeous blossoms that I think would add just the right touch of chic-ness to my bathroom. I'll probably put them in white frames to make them look seamless against the wall.


June 29, 2010

It's My Lucky Day

John and I walked into Target and found this beauty in the Bath section.


It's going to look fantastic in my bathroom above the toilet. Woo Hoo!

June 25, 2010

Bathroom Inspiration

There are 2 rooms in our house that have not been touched since we moved in over a year ago....the guest bathroom and the master bathroom. At the time we moved in, we had no idea what we wanted to do in the bathrooms so we just left them as-is. And it was probably for the better. We've had a lot of time to think about what we want and shop around. And of course John and I want different things. So here it comes, the compromise. Shocker, I know. John gets to design the guest bathroom and I get to design the master bathroom. You might be thinking that I'm nuts, letting my husband pick out the decor for the guest bathroom, but let me tell you, he has a great eye. I'm so excited to see how they both turn out.

Because John and I don't plan on living in our condo for the rest of our lives, we are choosing to make easy and cheap upgrades that will give us the most bang for our buck. I'll fill you in on the details as we go, but we're not doing any huge renovations (that I know of).

I've been doing a lot of web-surfing, searching for inspiration for my part of the compromise - the master bathroom. I really want a relaxing, spa-like feel in our bathroom. Pale color on the wall, crisp, clean and white. Here are a few that I really like...


In the above bathroom, I like the sunburst mirror, the gorgeous tile and the large trough-like sink. But I really love the crystal knobs on the vanity. Note to self: start looking for cheap crystal-like knobs. Up next...


The tub would be a wonderful addition, but no major renovations, remember? I love the ledge lined with candles. Candles definitely make a bathroom feel like a spa. Note to self: incorporate candles into the final design. Next...


The countertops in the above picture look a lot like our existing countertops. And don't they go great with the white vanity. I love the towel shelf/rack above the toilet. Does anyone know where to get something like that? It makes me think of a hotel room, which always feels relaxing, like I'm on vacation in my own house. Movin' on...


Here it is! This light gray color will go perfectly with the dark gray in our master bedroom. The white vanity with gray marble countertops and gorgeous crystal knobs are exactly what I want. The tile part way up the wall has a bead board appeal, which I love and want to try in the master bathroom! And I also love the thick moulding and the fresh flowers on the counter. Perfection.

So let the fun begin. My task list looks something like this (although it will probably change a million times before I'm done):

- find a light gray paint color
- find new flooring
- look for crystal knobs for the vanity
- look for a new towel rack
- cut mirror down and frame with moulding
- find new bath rug
- find new faucet to match towel rack
- find new light fixture for above mirror
- learn how to install beadboard & moulding
- look for ways to organize the stuff in the drawers & cabinets under the vanity

I'll post "before" pictures as soon as I take some. Promise.

In the meantime, what do you like about these bathrooms? Anything you don't like and think I should stay away from? Any suggestions on paint, flooring or accessories?

June 24, 2010

A Little Present Just For Us

This little gem was left to us by the previous owners of our condo. Just open the blinds and there it is. Looks easy enough to remove, except that this little gem was placed on the window before the window tint was applied. John's got his work cut out!

June 23, 2010

Organized and Happy

A few weeks ago I had the urge to organize. Do you ever get the feeling that something is just chaos and organizing it is the only way to keep your sanity? I happen to get that feeling more than I'd like to admit. And John usually complies with my urges. So off to Target we went. We grabbed a few of those cheap plastic tubs and a 5 drawer roll-y thing-y. I think the total was about $20. Then I emptied everything out of the hall closet and John and I went to work sorting, condensing and organizing. And Voila! 


June 22, 2010

New Condo Pictures

On "Our Condo" tab at the top of the page.


Go check it out.


http://thisisthefabulouslife.blogspot.com/p/our-house.html


Leave comments.


I like comments.

March 28, 2010

Side Table Splurg

John and I splurged on new side tables yesterday. We found them at this little shop near our church that sells awesome antique pieces, including solid wood furniture. The shop has been there since 1975 and is filled to the max with old, interesting things. We spotted these tables underneath a wicker coffee table and behind an old children's desk (that was totally awesome too). They are in great condition and they have hand-carved details on the front.

Here's a close up of the detailing.

We love our new tables! John loves that they have a drawer. I love that they match our bedroom perfectly and that they look really cool with their antique character.

Next up...curtains in the bedroom. The curtain saga seems like it will never be finished....